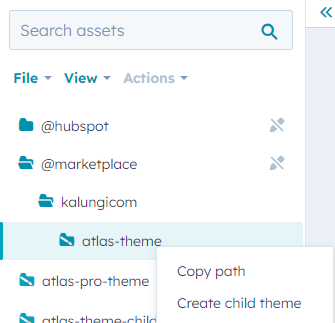
Creating a Child Theme (1 of 5)
The first step when purchasin any theme, is creating a child theme. A child theme is a new version of a parent theme that we can use to override certain files of the theme if needed. From simple design tweaks to customizing templates, child themes are the easiest way to have complete access to your theme, and will only require you to take a simple intial step to set them up.
But doesn’t that get confusing, having two sets of files? Well, that’s the beauty of a child theme: It doesn’t contain an entire set of files. A Child theme only contains base files, and inherits the rest of files from its parent. If you even need to override a file’s content, you can simply head over the that file in the parent theme, right click on it, and clone it to the child theme to start editing it.
- Use the Content dropdown in the navigaton bar to navigate to the Design Manager. If you can’t find the design tool within the Marketing dropdown, ensure a Superadmin of your HubSpot instance grants developer access to your account.
- Use the file browser to find the Atlas theme’s main folder. @marketplace ⇒ kalungicom. Right-click the Atlas theme and select Create child theme.

- You will be prompted to configure your child theme. It is recommended to use a descriptive name such as atlas-theme-child-yourcompanyname.
- Click Create child theme.
You're ready to go! From now on, you will select your child theme whenever you need to set up your Website Pages, Landing Pages, Blog Listing Pages, and Blog Posts.
